cse15l-lab-reports
Lab Report 1
How to log into a course-specific account on ieng6 (a remote server).
By: Francisco Garcia
Course: CSE15L
To begin logging into a course-specific account on ieng6, we first must understand what ieng6 is.
In it’s most primitive terms, ieng6 is a remote server for clients utilizing “editors” such as
Visual Studio Code.
For example, imagine you are on your laptop and you want to connect to the computer servers in the Computer Science Laboratory at UCSD.
The purpose of this is to execute powerful calculations that your small laptop simply can’t perform. Some calculations just require a lot of work. That is where these servers come in handy for individuals to perform these complicated calculations.
IMPORTANT: All of the steps described below are the same steps I took (I have Windows operating system). For simple understanding, the directions are written in second person. —
STEP 1: Installing VSCode
VSCode (aka Visual Studio Code) is an Integraded Developer Environment. There are versions for all major operating systems such as Windows or OSX systems.
To install in Windows, visit the VSCode website and click on the “Download for Windows” button. Ensure to download the most recent version (should be 64 bits).
Allow it to download, then open the application by searching for VSCode in your taskbar search menu at the bottom left of your computer.
Once opened, VSCode should look something like this:

STEP 2: Connecting Remotely
If you have Windows operating system, first install OpenSSH which will allow you to actually connect to the course-specific account through the remote computer or server.
After following the instructions found in OpenSSH installation, look up your course-specific account for CSE15L here.
NOTE: You will have an account for each course you are taking. Make sure to find the one that correpsonds to CSE15L and reset the password following the steps located in that webpage.
Now follow these instructions:
- Open VSCode.
- Open a new terminal in VSCode using the menu at the top or type
ctrl + ' - In the terminal, type the command
ssh cs15lwi22agc@ieng6.ucsd.edubut replacecs15lwi22agcwith your course-specific username. - You will you get an output question (yes/no), simply type yes and press enter.
- Enter a custom password or press enter (the password will not show it as you type so write it down so you don’t forget).
IMPORTANT: Your terminal should display something similar to the image below.

The above image describes that your terminal/laptop is now connected to the computers in the CSE building! Any commands you run on your terminal will run on these computers (servers)!
STEP 3: Trying some Commands
After connecting to the server ieng6, try running these commands in the terminal(this is not an exhaustive list):
cdcd~ls -latls -amkdirpwd
Now try running some commands on your client. To do this, logout of the ieng6 server
simply by using ctrl D or typing exit and pressing enter in the terminal.
The image below shows the commands I ran on ieng6 server and my Windows laptop after logging out (respectively).

What do you think these commands do? I tried various lscommands. To my findings, ls produces a list of files or directories.
STEP 4: Moving Files with SCP
Now, let’s say that you want to move files from your computer to a remote computer/server.
One way to do this is by using the scp command on your client (not when you’re logged into a server like ieng6).
Try this:
- Log out of
ieng6usingexitin the terminal (if you haven’t already). - Create a file on your computer called
WhereAmI.java. - Copy and paste these contents into the file:
class WhereAmI { public static void main(String[] args) { System.out.println(System.getProperty("os.name")); System.out.println(System.getProperty("user.name")); System.out.println(System.getProperty("user.home")); System.out.println(System.getProperty("user.dir")); } } - Run the file using
javacandjavacommands as you have learned in previous courses (CSE11 or CSE8B). Skip this step if you don’t havejavainstalled in your computer. - Now run
scp WhereAmI.java cs15lwi22agc@ieng6.ucsd.edu:~/withcs15lwi22agcreplaced with your username. You should be asked for a password (it is the same as when you logged into your course-specific account usingsshin STEP 2). - Now log back into
ieng6like you did in STEP 2 and enterlsin the terminal. You will find the WhereAmI.java file in your home directory. You can run this file inieng6now, usingjavacandjava.
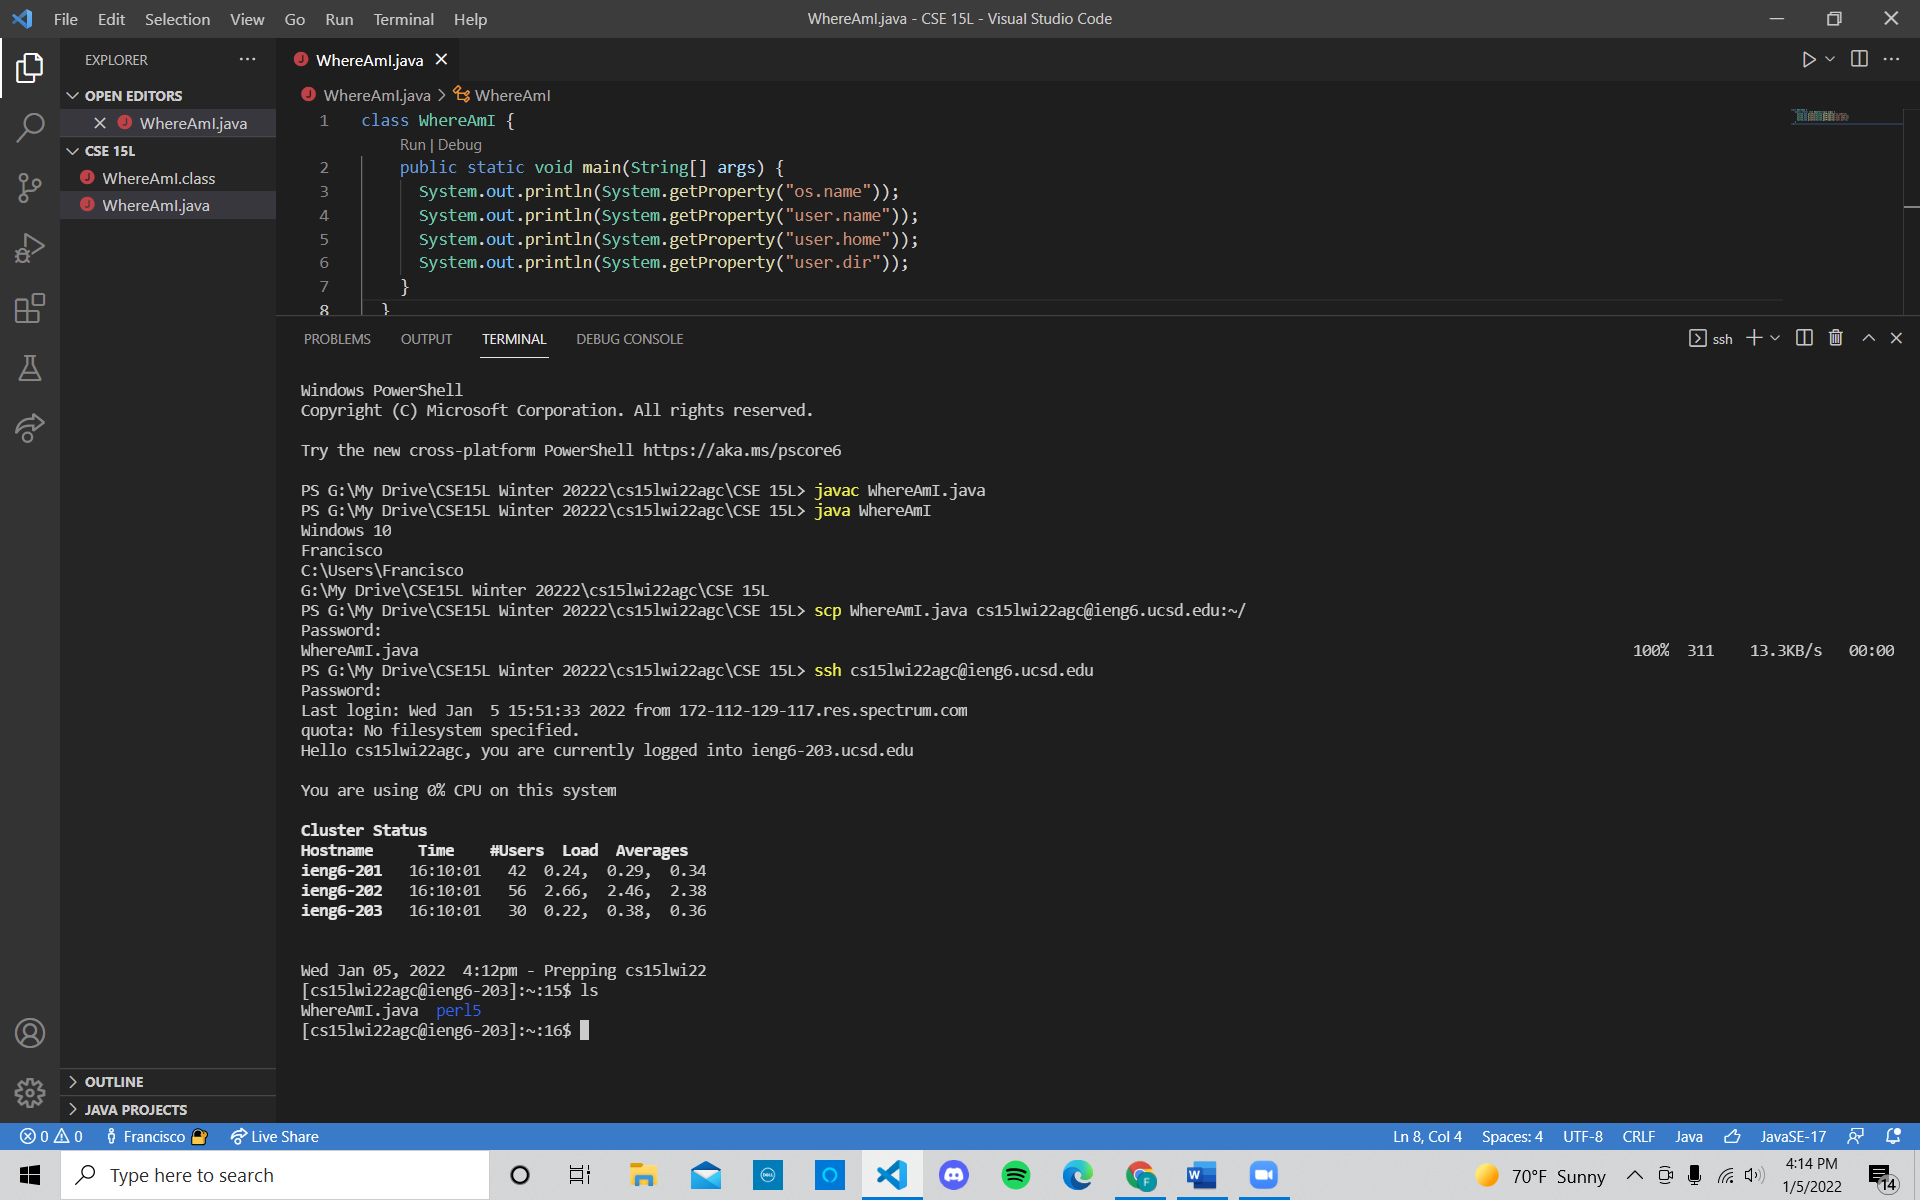
The image above shows what the same steps that I took (as described above), and the WhereAmI.java file in the home directory.
STEP 5: Setting an SSH key
Consistently logging into your course-specific account onto ieng6 takes a lot of time, especially typing in your password every time.
To automate this process a little, you can use ssh keys.
Try the following:
- Type
ssh-keygenin your terminal. - The terminal will then ask you a series of questions such as passphrase.
- Press
enterthree times (or you can make a passphrase but make sure to remember it!). Your output will look something like this:PS C:\Users\Francisco\Documents\GitHub\cse15l-lab-reports> ssh-keygen Generating public/private rsa key pair. Enter file in which to save the key (C:\Users\Francisco/.ssh/id_rsa): C:\Users\Francisco/.ssh/id_rsa already exists. Overwrite (y/n)? y Enter passphrase (empty for no passphrase): Enter same passphrase again: Your identification has been saved in C:\Users\Francisco/.ssh/id_rsa. Your public key has been saved in C:\Users\Francisco/.ssh/id_rsa.pub. The key fingerprint is: SHA256:8HUcJGvtSo5yoT8lIepsJZupofoSwju2hX1R7fPQfJQ francisco@DESKTOP-ES7A2CB The key's randomart image is: +---[RSA 3072]----+ | . = .. | | .. .+ +E | | oooooo. | |. o .S=.o.. | |o.o o o..==.. | |.oo= Bo ooo. | |.=..O +. | |=+=o .. | +----[SHA256]-----+NOTE: Your output may differ slightly by not having the
Overwrite (y/n)?. I simply got this question because I have already done this process. If you have done this process before, you will have the same question as I recieved. - Then type
ssh-add 'C:\Users\Francisco\.ssh\id_rsa'into your terminal (only difference is the username afterUsers/). - If you recieve an output stating the directory does not exist, open your search menu on your laptop, and search for
services. - Once in services, scroll down to OpenSSH Server. Click on it, and change the status to
Manual. - Now open the search bar once more, and find Windows PowerShell. Open this and click on
run as Administrator. - Then a PowerShell terminal will open up. Type in these commands one-by-one:
Get-Service ssh-agent | Set-Service -StartupType ManualStart-Service ssh-agentGet-Service ssh-agentssh-add 'C:\Users\Francisco\.ssh\id_rsa', but instead ofFrancisco, input the username of the laptop from which you’re currently logged in as.
- You should get an output in the PowerShell stating that the “identity” was added to your desktop.
- Now to ensure this is correct, go back to VSCode and type
ssh-add 'C:\Users\Francisco\.ssh\id_rsa'into the terminal (you should get the same output as the previous step). - Now type
ssh cs15lwi22agc@ieng6.ucsd.eduinto the terminal and your password once more. - Enter
mkdir .sshinto the terminal. - Logout using
exit. - Now enter
scp /Users/Francisco/.ssh/id_rsa.pub cs15lwi22@ieng6.ucsd.edu:~/.ssh/authorized_keys, withFranciscobeing replaced with your username. - If you followed these steps correctly, the terminal should no longer ask for your password whenever you use the
sshorscpcommands.
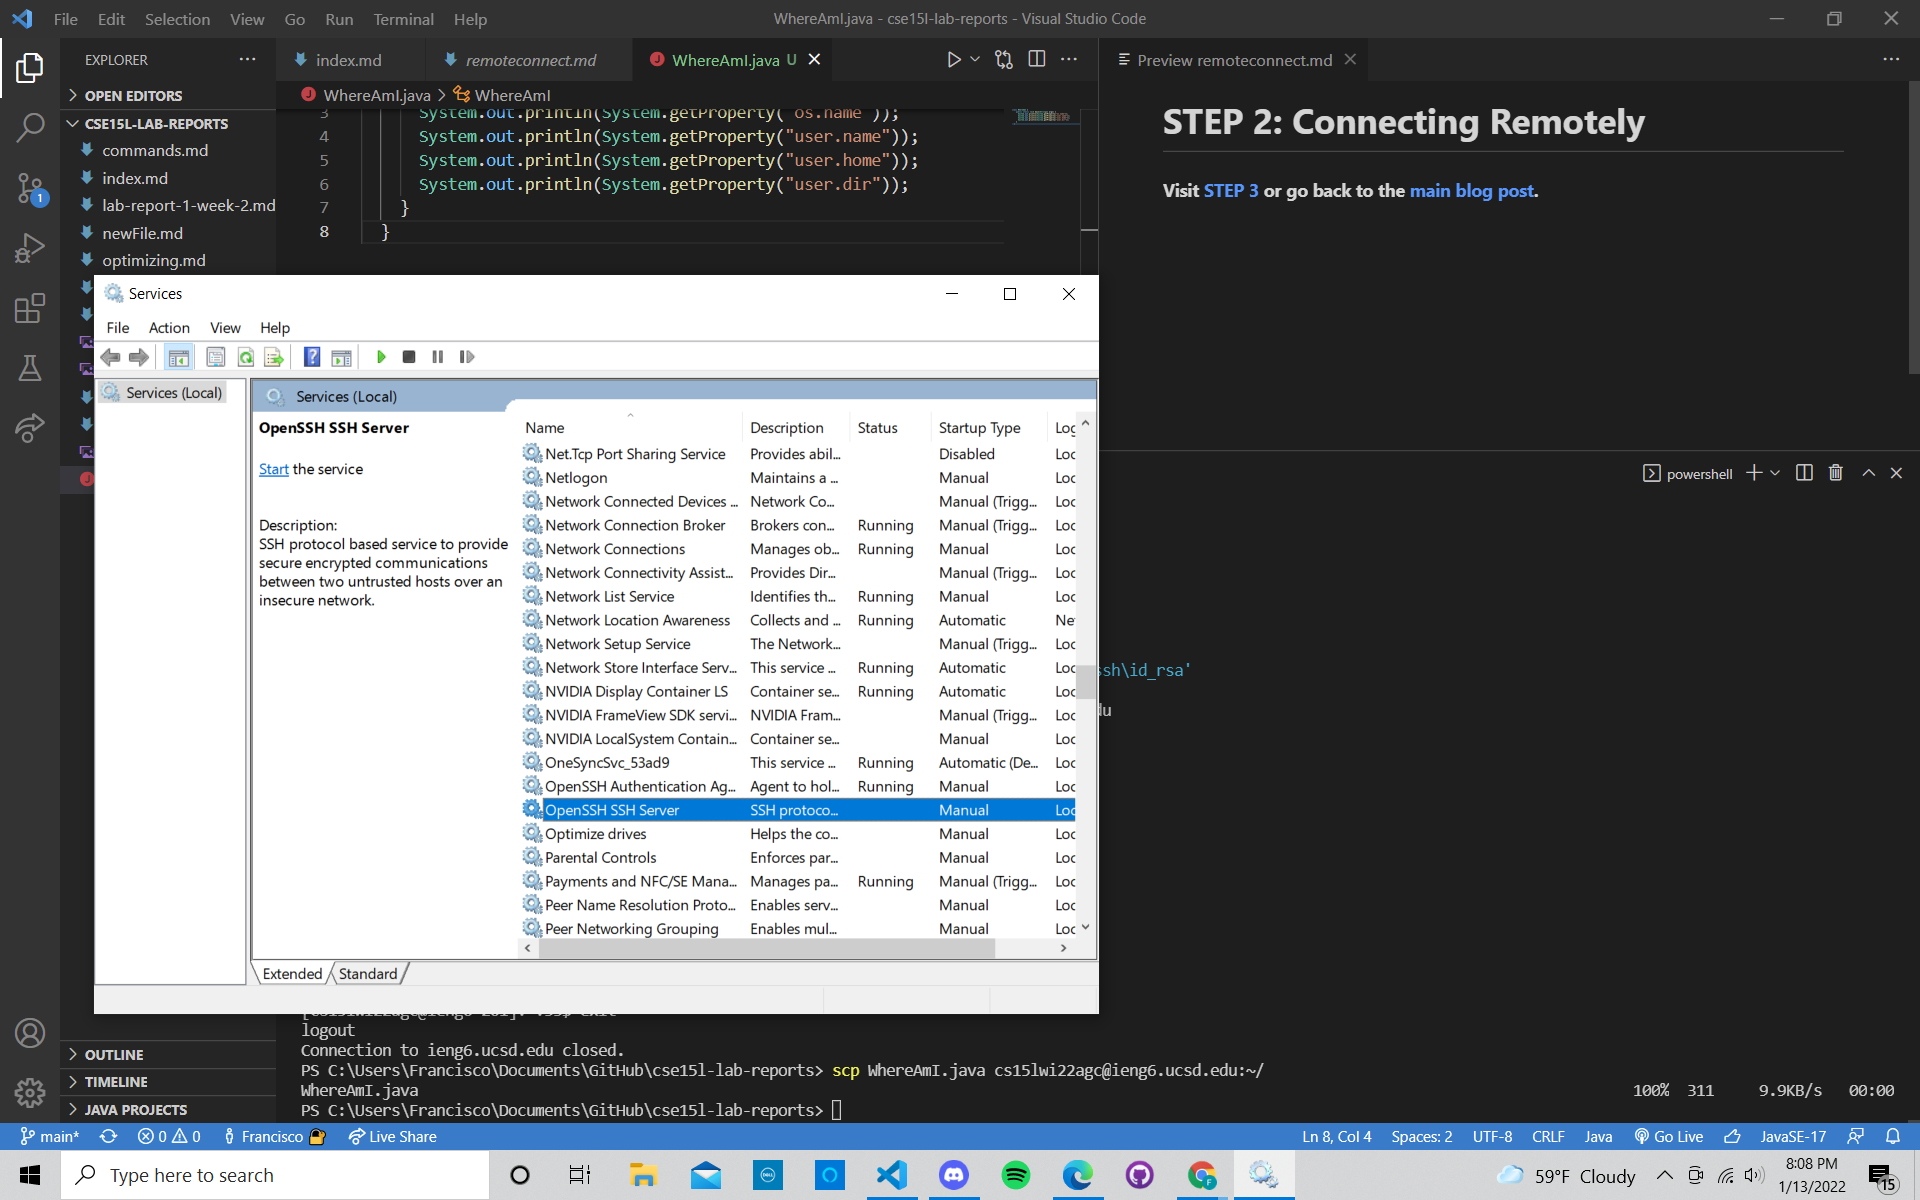
Below is an image of changing OpenSSH Server to Manual.
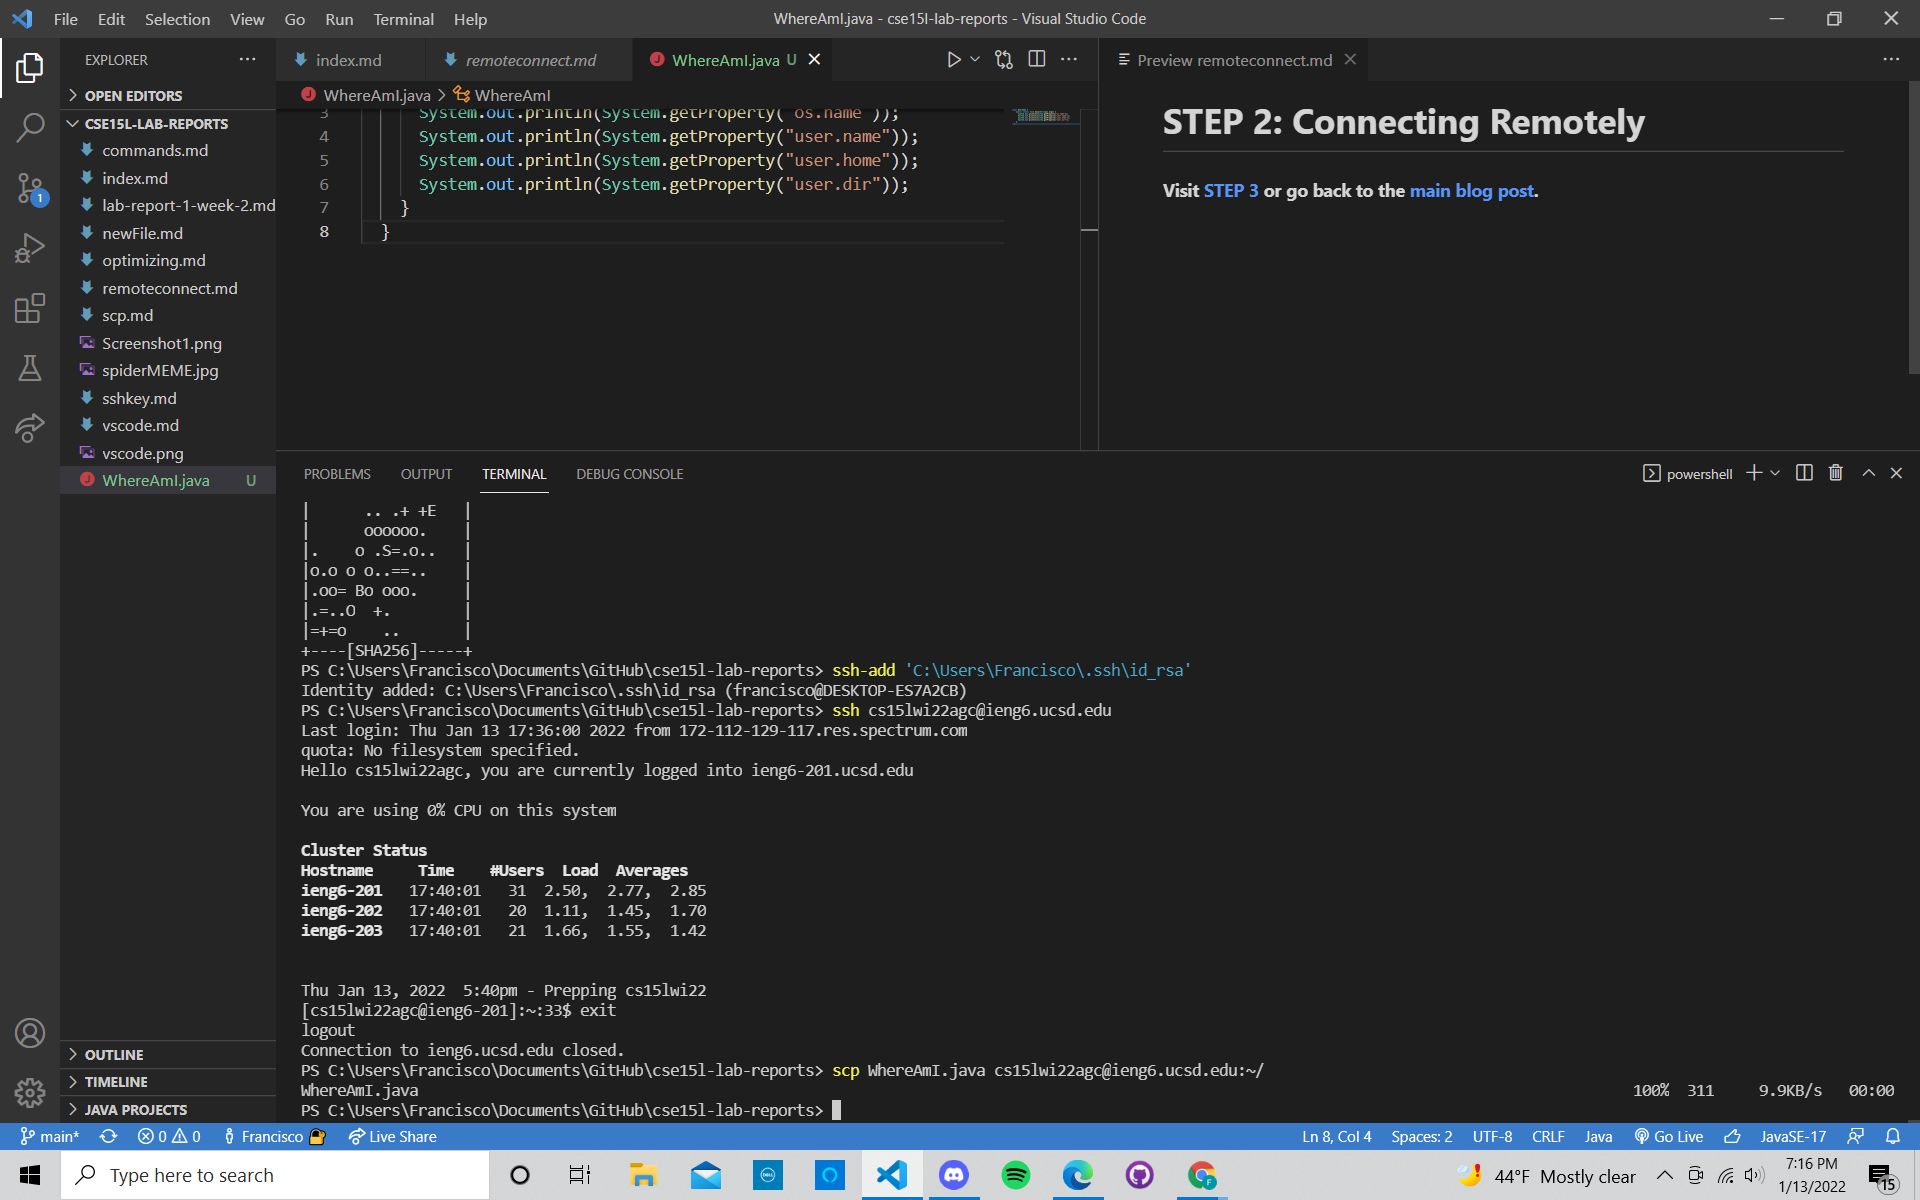
Below is an image of how the terminal should respond by no longer requiring your password whenever using the ssh or scp commands.
STEP 6: Optimizing Remote Running
Now you’re ready to go! In this class, you will always want to optimize as much as possible.
- In the case of remote running, you can use quotation marks for certain commands that you would like to run directly in the remote server.
- You can also use semicolons to run multiple commands in your terminal on one line.
- Don’t forget! You can also use the
^arrow to recall the prevoius commands.
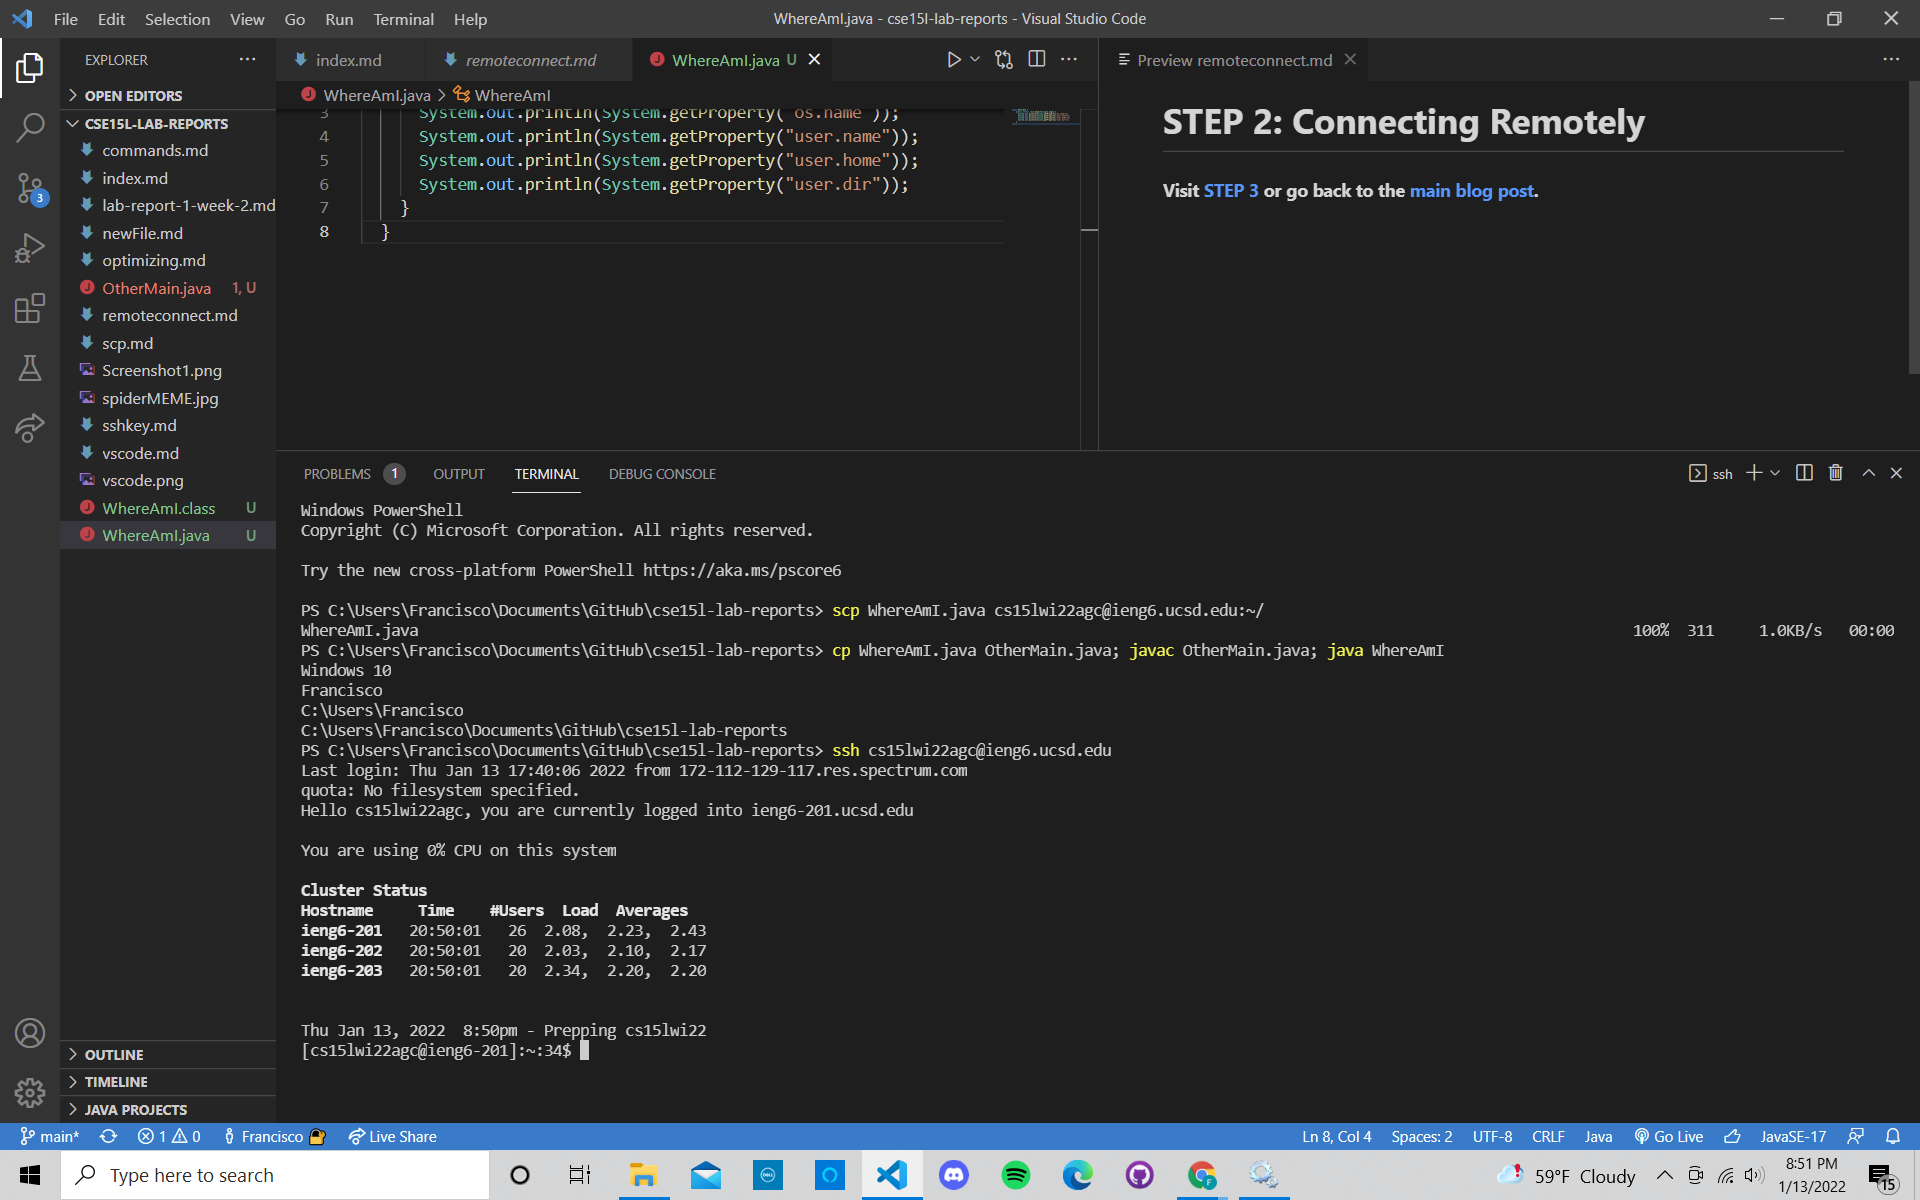
Below is an image displaying how using ; and ^ looks like. Give it a try!
Now here is the best way to edit a file locally, and copy and run it on a server:
- Open the
WhereAmI.javafile that you initially created in STEP 4. - Make an edit to the file (ex: try
System.out.println("Hello world, from my server!")) in thepublic static void main(String[] args){}. - Now type
scp WhereAmI.java cs15lwi22agc@ieng6.ucsd.edu:~/into the terminal (replacecs15lwi22agcwith your course-specific username). - Now type
ssh cs15lwi22agc@ieng6.ucsd.eduinto the terminal to log into the remote server (replacecs15lwi22agcwith your course-specific username). - If you did STEP 5 with
sshkeys correctly, the terminal will not ask you for your password. - Now compile the file in the remote server by typing
javac WhereAmI.java. - Now run the file in the remote server using
java WhereAmI.java. - DO NOT forget that you can also use the
^arrow to recall the prevoius commands.
Your terminal should look something like this!
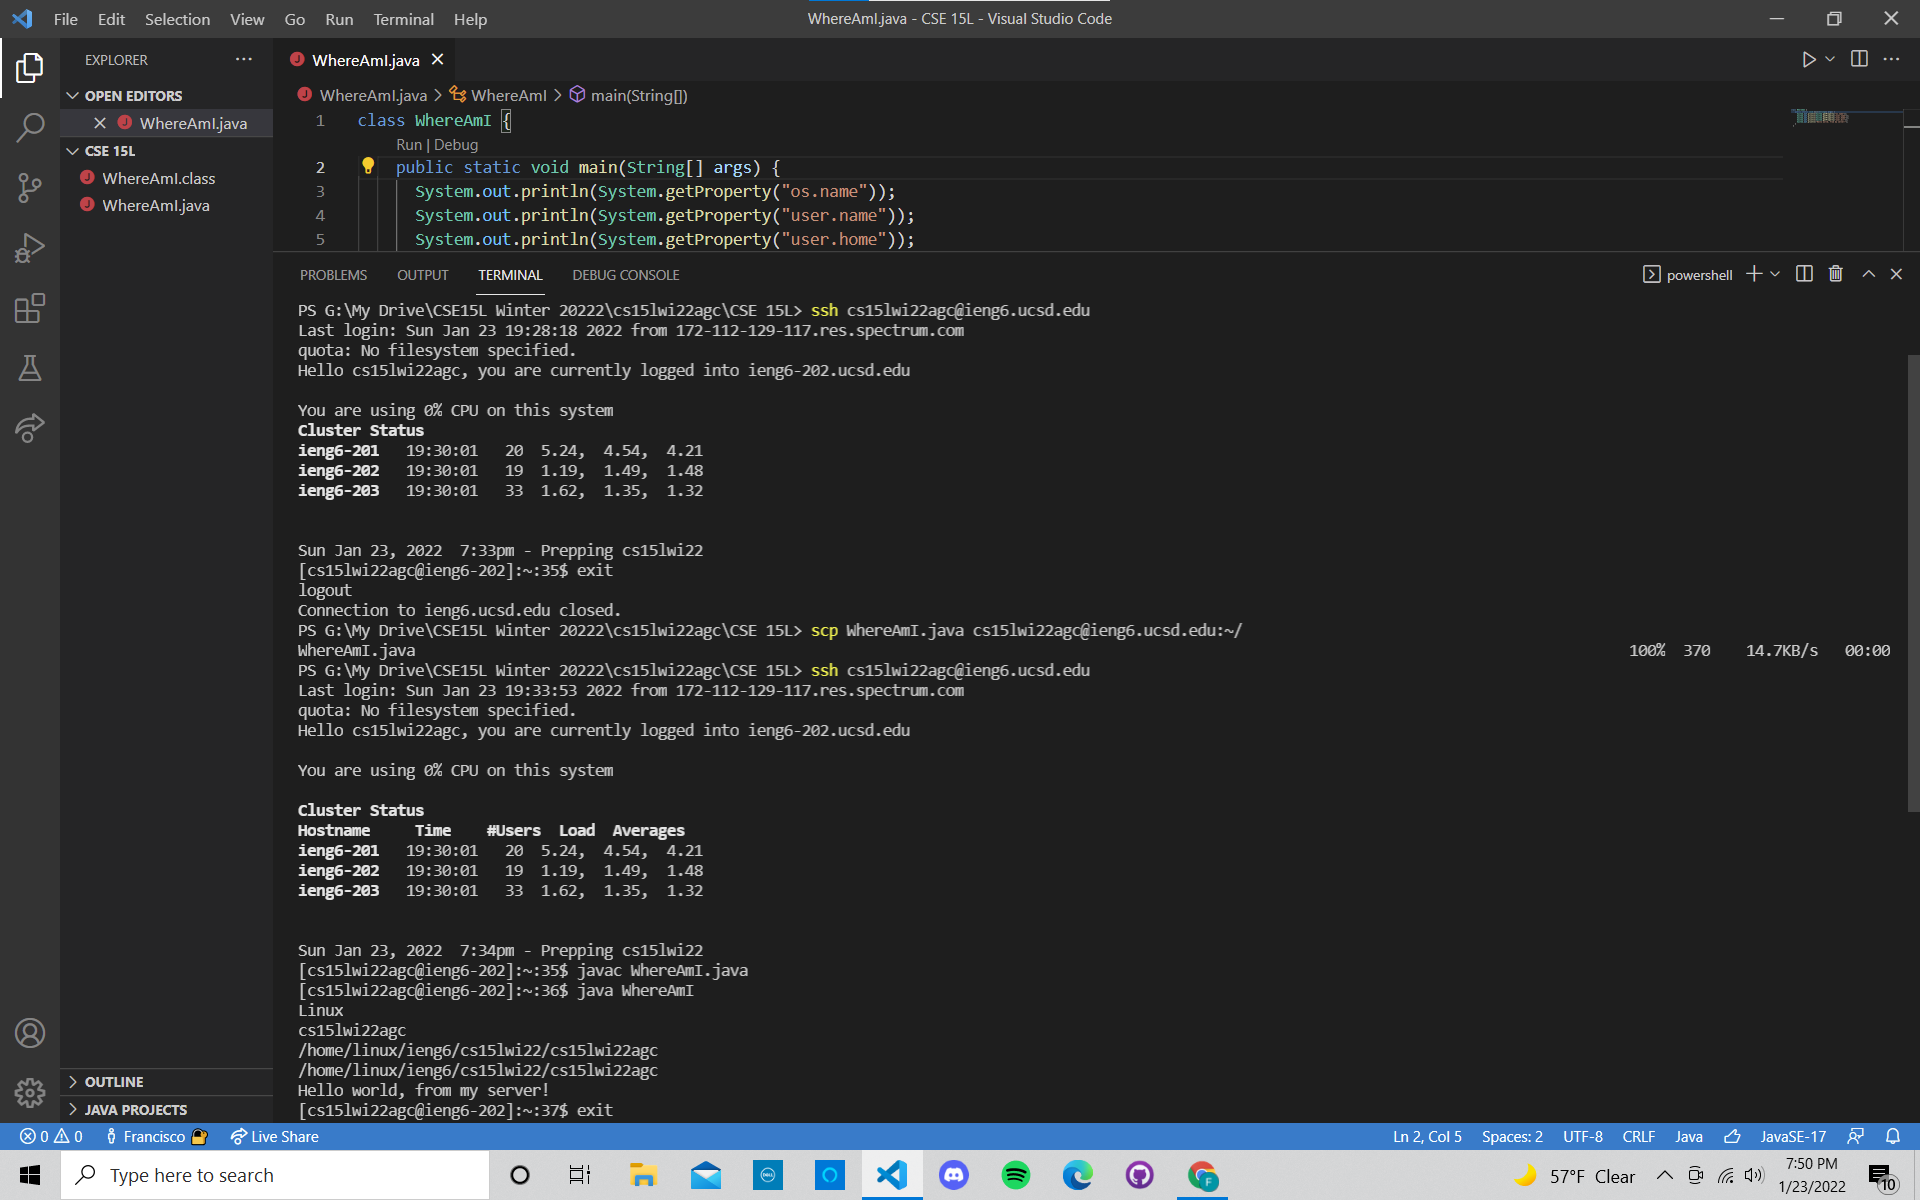
NOTE: On average, this process should take about 3 mouse-clicks, 10 keystrokes in the terminal (using the ^ key), and about 60 seconds.
NOTE: The keystrokes for editing the file were not included in the total count because different users may include different edits, which will account for different amount of keystrokes.
And that is how you log into a course-specific account in ieng6!
I really hope that helped! Don’t forget, stay healthy amidst this pandemic!

Date: January 13, 2022